You can make your own Firebolt in Photoshop by viewing and following this tutorial on Youtube.
Likewise, here's what I did today. :)
Showing posts with label Tutorials. Show all posts
Showing posts with label Tutorials. Show all posts
Friday, June 4, 2010
Friday, January 8, 2010
DAZ Studio Advanced Tutorial 2
Rexturing DAZ Studio Content
Part 1:
Simple Clothing
Today, I thought we'd learn how to do a simple retexture of a piece of clothing for 3D. Most namely, the Speedo in M4 Basic Wear. I did a leather texture, but since my Beta Testers have reported problems with the testing, I have to redo certain textures. The first is the Camouflage texture.Part 1:
Simple Clothing
Here is the texture we are using.
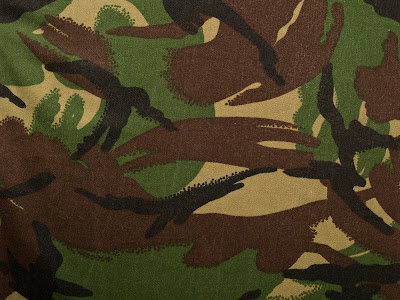
Now download the texture from Stock Exchange. If you notice the standard restrictions, we are allowed to use it as we see fit. As long as we don't use the texture for pornography or to victimize persons. Since we are doing a retexturing job, it doesn't qualify. So, download the basic wear templates, available at Digital Art Zone.
After you downloaded them, open photoshop and DAZ Studio. In photoshop, open M4BW_Sp.jpg. You should get a wire mesh. This is the UV map of the M4 Speedo. It should look somewhat like this:
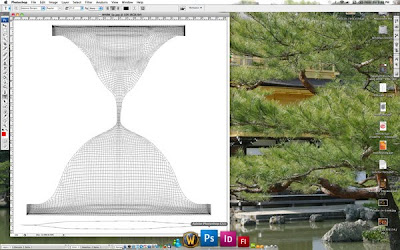
Now, lets open our Camouflage texture up in Photoshop. After opening it up, alter it so it fits the dimensions of M4BW_Sp.jpg. Which is 2048x2048. Then select all on M4BW_Sp.jpg and move it over the Camouflage texture. This creates a Speedo layer, you can name it so if you wish.
After you have it matched up, use your Magic Wand tool to select all the white space outside the template. After it's selected, you then inverse your selection using Shift-Command-I (on a Macintosh computer). Expand your selection by 2-4 pixels, and then press delete. What you should have is this:
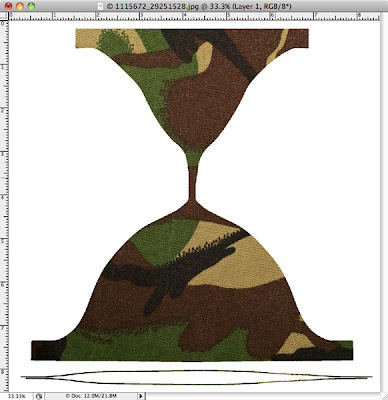
Save your texture as a JPEG file. Then open DAZ Studio, load M4 and the Speedo. As you can see here.
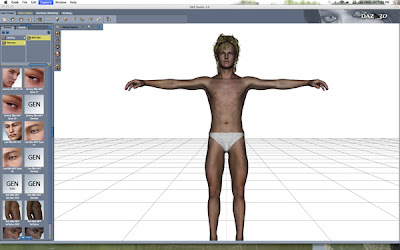
All that is left is to go into the Surfaces tab of DAZ Studio and resurface the Speedo with your new texture. Select Speedos or Speedos Upgrade, and in the Advanced tab, select the down arrow on Diffuse.
Notice that the texture is very much like a cotton texture? increase the Glossiness in DAZ Studio to about 95%. Now do a test render. Adjust the Specular in the surfaces tab to your liking (increase glossiness or decrease it to get certain effects.)
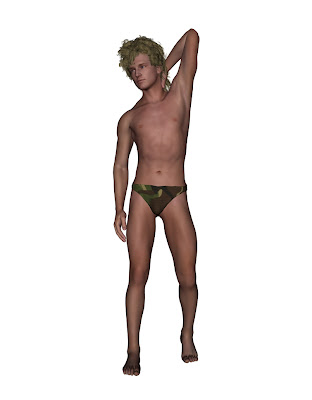 Once you have the effect you want, just simply make sure that both the Speedo and the Speedos is selected both in your scene and surfaces tab, and save as a .dsa material file (if you use DAZ Studio 3) or .ds material file (if you use DAZ Studio 2.x). Make sure you save it in your DAZ Studio/Content folder under Michael 4. And there you go, your first retexture in DAZ Studio.
Friday, July 24, 2009
DAZ Studio Glamour Shots Tutorial

While working on a class project yesterday, I quickly put together a glamour shot. Putting the glamour shot together was quite easily done. Doing glamour in DAZ Studio is easy.
Looking at the elements, I used about three spotlights and two Distant lights (bringing up the total to five). The secret to doing a glamour shot in DAZ Studio is lighting.
The lighting should bring out the face(s) of your subject(s) and make the subject stand out. Here I use a black background (consisting of a black geometric primitive plane), f.ober's foberini (a free Lamborghini model that should be sold on DAZ) blackened, and Victoria 4 in Aery Soul's Ozone outfit. All of these elements do not make a glamour shot.
Of course, the lighting can be improved in spots: changing the lighting model to skin and keeping the glossy render can make your 'model' stand out. But there are times when you don't need the model to stand out and it is still glamour and glitz.
The lighting I used was one yellow-white spotlight, one blue spotlight, and one really yellow spotlight (i.e. gold). I then used two distant lighting lights to represent light scattering, both at 50% intensity. Although instead of using a dark grey scatter from the ground, I used a white light scatter from the ground. This softens shadows and makes your figure stand out more.
I used the usual studio scatter light, white light at 50% directed at Victoria. This stands her out a lot better. Then I set up the spotlights.
Spotlight setup requires some test rendering to see what your model will look like. I used a test render to see how intense the subject will be and I adjust the lighting of my spotlights accordingly.
Using Elite textures from DAZ, or the Elite Human Surface Shader
One of the important things to know is that the Elite textures from DAZ have an annoying habit to have a high specularity when using spotlights. I found this out when doing a horror shot. The specularity was so high that the spotlight at 100% washed out any color from Vicky's skin, creating an unnatural -- overexposed -- look. If you use the Elite textures for your glam shots, and no doubt you will since they are wonderful, beautiful textures; test render your scene and reduce the intensity of your spotlights as needed.
Wednesday, February 25, 2009
Mastering DAZ Studio, Introduction
So, you know shaders, you know magnets, you know lighting, you know all about the Cyclorama. You know where your content is, you know how to search for content on your other drives and use other runtimes. You feel confident with DAZ Studio, for you understand it enough to customize your interface and create art. So maybe. . . just maybe. . . it's time to master it to create really powerful ART.
Mastering DAZ Studio is a series of tutorials and projects that are designed to teach you to create stunning scenes with the tools you have, or don't have. These tutorials and projects help you to take advantage of all of DAZ Studio's features. From cartoon rendering, to powerful shader effects like poseworks' Effects. All of these are designed to help you take the next step and to create art on your own.
The first project is something that will test DAZ Studio's rendering time to create the scene below:

It's a scene from classic fantasy that is appropriate for such wonderful Campaign Settings such as the Judges Guild's Wilderlands of High Fantasy, Conan's Antediluvian world, the Ancient Classical World, Gor, and Greyhawk.
And I'm going to put together a tutorial that will help you to build it. So, whet your whistle true believers, it's time to Master DAZ Studio and create the ART you want.
Mastering DAZ Studio is a series of tutorials and projects that are designed to teach you to create stunning scenes with the tools you have, or don't have. These tutorials and projects help you to take advantage of all of DAZ Studio's features. From cartoon rendering, to powerful shader effects like poseworks' Effects. All of these are designed to help you take the next step and to create art on your own.
The first project is something that will test DAZ Studio's rendering time to create the scene below:

It's a scene from classic fantasy that is appropriate for such wonderful Campaign Settings such as the Judges Guild's Wilderlands of High Fantasy, Conan's Antediluvian world, the Ancient Classical World, Gor, and Greyhawk.
And I'm going to put together a tutorial that will help you to build it. So, whet your whistle true believers, it's time to Master DAZ Studio and create the ART you want.
Labels:
DAZ Studio,
Masters Series,
Tutorials
Subscribe to:
Posts (Atom)
