 The Next Part of exploring Photoshop is the manufactured beauty. I can enhance the beauty of models taken in a photograph now. So, this means that all beauty shots you see in magazines, including the Sports Illustrated Swimsuit Issue, is potentially manufactured.
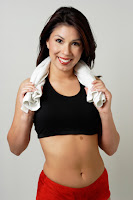
For instance, take this photo of a Latina I recently purchased from Canstockphoto. It's a perfect photo to work in manufactured or enhanced beauty. She has a few flaws that can be edited out and worked out with the CloneStamp tool. Notice the large mole on her body and the mole on her face.
Although at the time of this writing, I already have Photoshop opened and ready to use. In fact, I used Photoshop to change the DPI of this picture from 300 (print quality) to 72 (screen quality). So, lets use the Clone Stamp tool to first remove the blemishes to make her more presentable for certain magazines.
1. I revert the Photo back to it's original size (from 72 DPI to 300 DPI). And I first go into my layers palette and clone the background as it's own layer. This insures that the editing I do is non-destructive to the original photo.
2. I first zoom on the first blemish, the large mole on her body, and select the clone stamp tool. With the first blemish removed, I can work on the bigger blemish.
3. I zoomed in on the mole on her face. Again, using the clone stamp tool, I proceed to erase it.
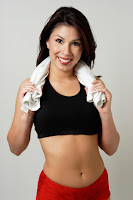
With thes
 e two erased, the photo now looks like this:
But I am not finished enhancing her yet. I can increase the size of her eyes to make her look much more cute. Still working from the Layer, I proceed to enhance her eyes.
4. I create a mask around her left eye, and then port it over to its own layer.
5. Next, I use the Free Transform tool to ever so slightly make her eyes bigger.
6. With that complete, I proceed to combine the Enhanced Beauty layer with the two eye layers.
Now, I venture to take care of any blemishes at once by enhancing the beauty over all using Smart Filters.
7. By setting up two gaussian blurs: one to darken and one to lighten. I then set the pixelation to about 10, and work with the median noise filter to set up some noise at 12 pixels.
8. Usi
 ng a Brush to brush out some areas I want to show through on the layer mask, I proceed to do her eyes and her lips and other areas I want to show through. Like her belly button.
9. Finally, I reduce the opacity of the smart filters which creates a softened effect.
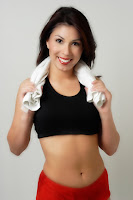
10. Keeping her smart filters in the orginal PSD, I get this result:
So, since I have manufactured beauty with Photoshop, changing a true unadulterated picture of a woman ready for the gym into a photo that is magazine ready, you can see for yourself how beauty is manipulated and enhanced for the printed page.
No comments:
Post a Comment